The Crafted Sparrow

Create to Inspire!

  • Home
  • About
    • Advertise
    • About Me
    • Disclosure
  • Tutorials
    • home decor
    • diy
    • crafts
    • Cricut
  • recipes
    • Appetizers
    • Sides
    • Soups and Salads
    • Dessert
    • Drinks
  • holidays
    • new years
    • Valentine’s Day
    • st. patrick’s day
    • mothers day
    • fathers day
    • 4th of July
    • halloween
    • thanksgiving
    • christmas
  • free printables
  • Contact

DIY Jewelry Stand

10/30/2013 12 Comments

Do you love walking through your local second hand stores or dollar stores and brainstorm about the possibilities of what something could be?  I do!  I have had some ugly dollar store stove burner covers sitting in my garage for about a year.  I knew all along what I wanted to do with them, create a tiered jewelry stand.  Only took a year to create it, but it’s done and today I’m showing you how easy it is to make this DIY Jewelry Stand.

Supplies:

–  Dollar Store Stove Burner Covers {Dollar Tree}
–  Large Unfinished Wood Spools {Hobby Lobby}
–  Unfinished Wooden Round Ball with Flat Bottom {Hobby Lobby}
–  DecoArt Acrylic Paint {accent color for spools & round ball, and black for the trays}
–  Foam Brush
–  Gray Spray Paint Primer {Walmart 98cents}
–  Silver Spray Paint {any brand}
–  Small Wooden Dowel {optional}
–  Hot Glue or E6000
–  Twine or Jute


1.  Begin by spray painting both covers with your gray primer, let dry then spray with silver spray paint.

2.  Paint your wooden spools and round flat bottom ball with your acrylic paint in your accent color.  I used DecoArts Americana in Bahama Blue.  Once dry I sanded mine lightly on the edges, this is optional.  I wanted a roughed up look.  I then hot glued some jute to mine so it looked like spools of jute.

3.  Take a small amount of black acrylic paint about the size of a dime.  Add about 2-3 tablespoons of water in a small bowl or plate.  Mix well.  This is the wash for your covers to look aged and galvanized.  I brushed it all over one side of the cover at a time, being sure to cover it well.  Then I let it sit for a second or two, then with a paper towel I wiped most of it off.  You may have to repeat this step a few times to achieve the desired patina.  Once I got the nice dirty metal look I wanted I let it dry.  You can spray them with a clear sealer if you want, but I didn’t.

4.  You have two options for assembling this.  You can either glue it all together or you can put a dowel rod through the center.  I had a dowel rod that fit in the spools perfectly on hand so I used that.  If you choose to go with the dowel rod simply just find your center point on both burner covers and mark it, then use a drill to create a hole large enough for the dowel to fit through.  I then used some hot glue to glue two of my large spools together for the middle.  Then hot glued the round ball to another spool for the topper.  I also placed hot glue inside each piece as I placed the dowel rod through the center.  If your choosing to glue it all together I suggest using E6000 glue.  Just glue it all together and let it sit in a place it won’t get touched or moved for at least 24 hours.  You can add a small wood circle piece to the very bottom spool for more stability if you want, I didn’t but will probably go back and add one.  Also these covers are thin, so they won’t support a ton of weight unless your able to find thick ones.  You could also use different sized cake tins for this project.  Those are nice and sturdy.
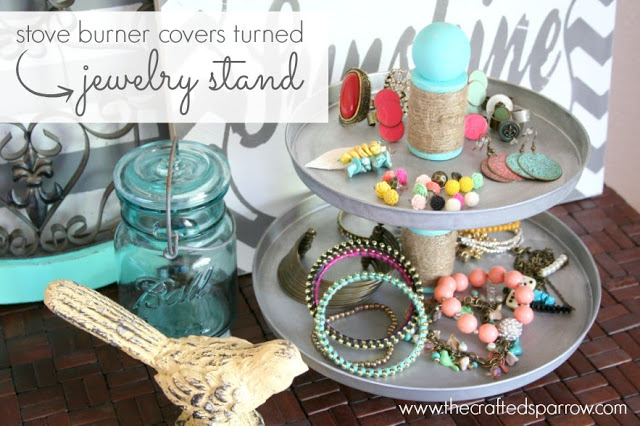

*  I would not use these stands for food, unless you are lining them with paper of some kind.

Related Posts

  • 25 Kitchen and Pantry Organization Projects & Ideas25 Kitchen and Pantry Organization Projects & Ideas
  • Notebook Paper ChalkboardNotebook Paper Chalkboard
  • Numbered Mason Jars – using DecoArt paintsNumbered Mason Jars – using DecoArt paints
  • 20 Bathroom Organization Projects & Ideas20 Bathroom Organization Projects & Ideas
  • DIY Slip Covered Ottoman & Freezer Paper Stencils {it’s a double post!}DIY Slip Covered Ottoman & Freezer Paper Stencils {it’s a double post!}
  • Back to School Striped Mason JarsBack to School Striped Mason Jars

Filed Under: diy, organization, Tutorials

« The Handmade Nest {Craft Kits now for Sale!}
Vanilla Spice Cupcakes »

Comments

  1. snaps-of-ginger says

    10/30/2013 at 1:51 PM

    This is exactly what I need! The top of my dresser gets so junked up with jewelry. It would be perfect for keeping the pieces I wear the most handy but still neat.

    ~Cheryl
    http://snaps-of-ginger.blogspot.com/

    Reply
  2. Karen says

    10/31/2013 at 11:09 AM

    Cute! This would look awesome in my sewing room with my sewing tools on it. Nice job.

    Reply
  3. Cuchikind says

    11/01/2013 at 1:43 PM

    That looks so cool, I like it!!!
    Steffi

    Reply
  4. marcy gilligan says

    11/04/2013 at 1:10 AM

    So cute! I will be making this!!

    Reply
  5. wat l says

    11/08/2013 at 9:33 AM

    The Chanel Coco Mademoisella commercial features the stunning Keira Knightley paired with the heavenly sound of Joss Stone singing ‘Nat King Cole’ L-O-V-E.replica handbags uk And earlier for the fall Ad, Keira stripped down for Chanel and for a reported $1 million dollar, but this brunette beauty does have reason to feel very self-confident. With an amazing toned body, beautiful skin, and dark sultry hair,replica designer handbags Jessica Alba is the woman of many men’s fantasies. Right now she is in Vancouver and was spotted out to lunch with friends looking very casual.

    Reply
  6. Anonymous says

    12/08/2013 at 12:46 AM

    This is so cool…..thanks for sharing.

    Reply

Trackbacks

  1. 75+ Gift Ideas under $5 says:
    05/02/2014 at 8:23 AM

    […] Jewelry Stand from The Crafted Sparrow […]

    Reply
  2. 25+ DIY gift ideas for under $10 says:
    11/13/2014 at 12:11 PM

    […] Jewelry Stand by The Crafted Sparrow […]

    Reply
  3. Weekend Inspiration: DIY Jewelry Storage and Display | Menat Designs says:
    11/21/2014 at 10:45 AM

    […] Tutorial found on The Crafted Sparrow […]

    Reply
  4. Diy Wooden Jewelry Stand – Finn P Ramsey says:
    06/25/2016 at 6:50 AM

    […] necklaces get tangled in all locations, so i needed a better way. Meet my diy jewelry organizer. Diy jewelry stand the crafted sparrow. Turn a common dollar store find in to something so much more with this diy jewelry stand. Get […]

    Reply
  5. 20 DIY Jewelry Organizers That Are Fun To Make - Andrea's Notebook says:
    10/17/2016 at 3:01 AM

    […] The Crafted Sparrow – DIY Jewelry Stand […]

    Reply
  6. HAPPY Holidays: DIY Antler Ornaments! -- Tatertots and Jello says:
    11/14/2016 at 7:03 PM

    […] and she has an amazing sense of color! Here are a few of my favorite projects she’s made: DIY Jewelry Stand This an awesome organizing idea, and it would make a great DIY gift idea for someone! Felt […]

    Reply

Leave a Reply Cancel reply

Your email address will not be published. Required fields are marked *

This site uses Akismet to reduce spam. Learn how your comment data is processed.

  • Email
  • Facebook
  • Instagram
  • Pinterest
  • Twitter

Copyright © 2025 · Genesis Framework · Design By: Key Lime Digital Designs · Privacy Policy · Log in