The Crafted Sparrow

Create to Inspire!

  • Home
  • About
    • Advertise
    • About Me
    • Disclosure
  • Tutorials
    • home decor
    • diy
    • crafts
    • Cricut
  • recipes
    • Appetizers
    • Sides
    • Soups and Salads
    • Dessert
    • Drinks
  • holidays
    • new years
    • Valentine’s Day
    • st. patrick’s day
    • mothers day
    • fathers day
    • 4th of July
    • halloween
    • thanksgiving
    • christmas
  • free printables
  • Contact

Gold Wishbone Necklace

11/08/2013 18 Comments

I’ve seen wishbones everywhere lately, in fact I love this one HERE from Anthropologie.  Although a knick knack with a $58 price point is not in my budget, unless it was guaranteed to bring me 3 magic wishes.  I love the design so much I thought how fun it would be to create a necklace, so I made this Gold Wishbone Necklace.  


I have also teamed up with my fellow blogging buddies for our monthly blog hop, so be sure to check out all the amazing ideas…and if you haven’t guess it our theme for this month is Gold.

For the Gold Wishbone Necklace you will need the following supplies:
–  Polymer Clay
–  Gold Jewelry Chain 
–  Gold Jump Rings, 3 (4 or 5mm) & 1 (5 or 7mm, depends on how big your wishbone is)
–  Pliers
–  Gold Spray Paint
1.  Roll your clay in to a ball, place on either a smooth mat or parchment paper.
2.  Now roll your clay in to a long snake like shape.
3.  Bend your clay like shown above.
4.  Gently pinch the top arch together to create the top of the wishbone.  Smooth edges as you go.
5.  Trim your ends to match up.
6.  Roll your ends up like shown above.
7.  Gently pinch the ends and smooth.  At this point smooth the wishbone all over, smoothing out any creases or blemishes.  You will not be able to avoid fingerprints necessarily, but you can do your best to smooth them out with your fingers.  Just be gentle. Use a toothpick to create a hole in the top of the wishbone for your necklace. 
At this point transfer your clay to a clean dollar store cookie tray that has never been used for baking (can never be used for baking after this either, only for clay) or parchment paper.  Place in a pre-heated 275* oven for 20-30 minutes, but be sure to follow package instructions.  Remove, and let cool.  
Once cooled spray paint with your gold paint, or if you have a brush on version you prefer use that.  If your in a pinch and have gold nail polish you can also use that. 
Once the wishbone is dry and ready place your large jump ring in the wishbone, then add a smaller jump ring.  Then add the clasp with another jump ring to one end of your chain, and a plain jump ring on the other end of the chain after you add your wishbone charm.

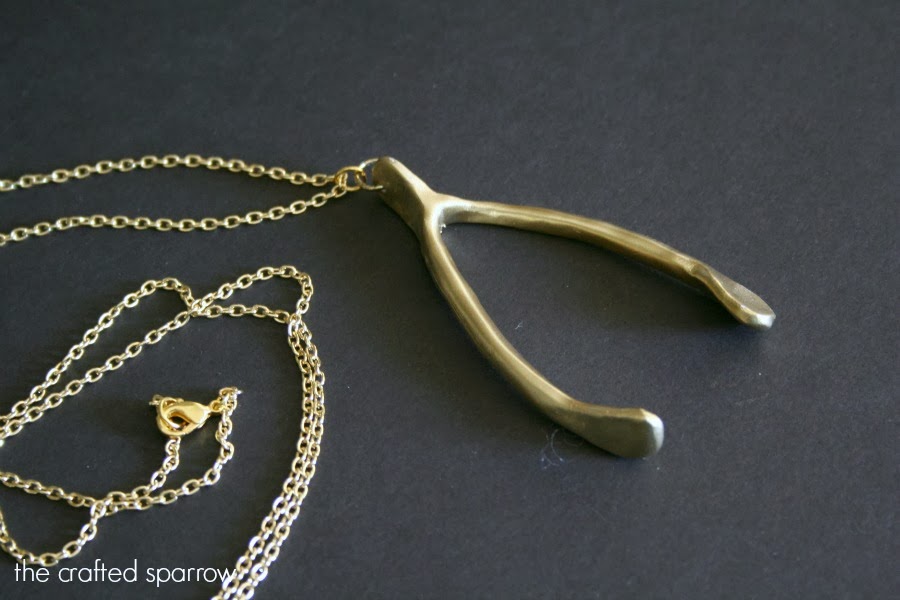
I love how it turned out, it’s not perfect or completely smooth – but I think that lends to the handcrafted look.  The larger you make the wishbone charm the more pliable it will be, so I suggest keeping your wishbone charms less than 2″ in size.  This is a great statement piece of jewelry if you’re looking for something a little larger, but still delicate in design.
Don’t forget to go check out my sweet friends and all their amazing ideas!
Gold Goodness @ Flats to Flip Flops
Gold Bud Vases @ The Benson Street
Ooey Gooey Salted Caramel Shortbread Bars @ Among the Youngs
Glittery Gold Banner @ Hollyhocks and Honeybees
Gold Leaf Art @ She’s Crafty
Gold Tinted Mercury Glass @ Free Time Frolics
Golden Memories Display @ Maybe I Will
Gold Wishbone Necklace @ the Crafted Sparrow

Related Posts

  • DIY Simple Turquoise NecklacesDIY Simple Turquoise Necklaces
  • DIY Silhouette Pendant NecklaceDIY Silhouette Pendant Necklace
  • Giant Bow NecklaceGiant Bow Necklace
  • Polymer Clay Feather NecklacePolymer Clay Feather Necklace
  • Gold Striped Mason Jar + Free Printable Holiday TagsGold Striped Mason Jar + Free Printable Holiday Tags
  • DIY Pineapple NecklaceDIY Pineapple Necklace

Filed Under: crafts

« Book Page Ornament
Coconut Hot Chocolate »

Comments

  1. snaps-of-ginger says

    11/08/2013 at 2:11 PM

    I love this!!! I have been trying to find a dainty-ish necklace for my youngest niece and this is perfect. And the fact that Aunt Cheryl made might even make it cooler…

    ~Cheryl
    http://snaps-of-ginger.blogspot.com

    Reply
  2. Andie Thueson says

    11/08/2013 at 4:25 PM

    So flipping cute!!! I usually stink at jewelry making but this looks like something I can handle! 🙂

    Reply
  3. kaylynnczy says

    11/08/2013 at 4:42 PM

    Ok. I’m in love with this. I will be making this – such a cute idea!!

    Reply
  4. Honeybee says

    11/08/2013 at 5:08 PM

    So fun! The perfect accessory to wear to Thanksgiving dinner! 😉

    Reply
  5. Meegan says

    11/08/2013 at 6:35 PM

    Serious skills! That is so incredibly cute!
    -Meegan

    Reply
  6. Emily @ The Benson Street says

    11/08/2013 at 7:00 PM

    Seriously, You sculpted that wishbone! I love your artistic ability! Sweet, I want one!

    Reply
  7. Ashley at flats to flip flops says

    11/09/2013 at 6:07 AM

    What? You are too crafty for me! Luv it!
    Ash:)

    Reply
  8. Adrienne Woods says

    11/09/2013 at 9:53 PM

    I am adding this one to my list of jewelry to make. I love it!

    Reply
  9. Lolly Jane says

    11/09/2013 at 5:10 PM

    So so cute, Becs. LOVE it!!

    Reply
  10. Stephanie Paxman says

    11/10/2013 at 4:21 AM

    Pretty pretty!!

    Reply
  11. kami @ nobiggie.net says

    11/12/2013 at 1:38 AM

    I love this! Great DIY!

    Reply
  12. jessica m. says

    11/14/2013 at 2:02 PM

    I love this! I can’t wait to make it!

    Reply
  13. Rebecca Lopez says

    11/18/2013 at 4:20 PM

    Thanks everyone! I’m so glad you like it!

    Reply
  14. The DIY Homegirl says

    11/19/2013 at 5:28 AM

    Very clever project! And I love how much money you can save with making this version. Thanks for sharing your creativity!

    Reply
  15. Rebecca Lopez says

    11/21/2013 at 2:39 AM

    The DIY Homegirl – Thank you!

    Reply

Trackbacks

  1. Blog Hop - Ooey Gooey Salted Caramel Shortbread Bars - Among the Young says:
    05/24/2014 at 9:10 AM

    […] Ashley and Meegan @ Flats to Flip Flops- Gold Goodness Emily @ Benson Street – Gold Bud Vases Kaylynn @ Among the Youngs- Ooey Gooey Salted Caramel shortbread bars Melissa @ Hollyhocks and Honeybees- Glittery Gold banner Candice @ She’s Crafty – Gold Leaf Art Adrienne @ Free Time Frolics – Gold Tinted Mercury Glass Andie @ Maybe I Will – Golden Memories Display Rebecca @ the Crafted Sparrow- Gold Wishbone Necklace […]

    Reply
  2. Golden Memories & A Blog Hop... - Maybe I Will says:
    01/22/2015 at 7:31 PM

    […] Ashley and Meegan @ Flats to Flip Flops- Gold GoodnessEmily @ Benson Street – Gold Bud VasesKaylynn @ Among the Youngs- Ooey Gooey Salted Caramel shortbread barsMelissa @ Hollyhocks and Honeybees- Glittery Gold banner Candice @ She’s Crafty – Gold Leaf Art Adrienne @ Free Time Frolics – Gold Tinted Mercury Glass Andie @ Maybe I Will – Golden Memories DisplayRebecca @ the Crafted Sparrow- Gold Wishbone Necklace […]

    Reply
  3. 7 Cute Polymer Clay Charms – Polymer Clay says:
    03/30/2015 at 7:55 AM

    […] Gold Wishbone Necklace from The Crafted […]

    Reply

Leave a Reply Cancel reply

Your email address will not be published. Required fields are marked *

This site uses Akismet to reduce spam. Learn how your comment data is processed.

  • Email
  • Facebook
  • Google+
  • Instagram
  • Pinterest
  • Twitter

Copyright © 2023 · Genesis Framework · Design By: Key Lime Digital Designs · Privacy Policy · Log in