
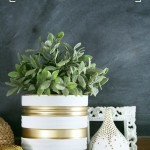
Did you know that DecoArt has a new paint line? The new Americana Multi-Surface paint is awesome, I’ve been waiting to get my hands on this new line of paints. It was worth the wait. Today I’m sharing the Stenciled Wood Box I made over with the new Americana Multi-Surface paints and Americana Stencils.
I’ve had this really great wood box sitting in my “to-do” cabinet for a while, I just didn’t know exactly what I wanted to do with it. Then I saw the new stencils from DecoArt and knew. I will be redoing my master bedroom soon and the fabrics I purchased have a great ikat print to them in bold colors.


Supplies:
– DecoArt Americana Multi-Surface Paint {Cottonball}
– Wood Box
– Foam Pouncer Brush or Foam Brush
– Americana Mixed Media Stencils {Retro Mod}


Start by making sure you wood surface is clean and dust free. If your wood surface is completely flat this stenciled project will be a breeze. If you have any kind of closures like my box has you will have to do your best around those areas. Use either painters tape or washi tape to tape the stencil in place.
Carefully dob your foam pouncer or brush in the paint and blot it a couple times on a plate, you don’t want it overloaded with paint. Begin carefully applying paint in an up and down motion until you get the desired coverage.
Carefully remove your stencil when your done with that section and just repeat the process until your box is completely covered.

I love it! I turned out just like I wanted it to. I left the top solid, I love the teak look to the box with the orange’ish wood tones. Who knows what I will fill it with…riches, jewels, ah who am I kidding probably a secret candy stash! I love it looks paired with some of my gold accessories. Like my little brass mouse? I snagged him from my Mom’s house when I moved out 13 years ago, we’ve had him since I was a little kid. He’s one of my most favorite little treasures that reminds me of home.


Disclaimer || I am a member of the DecoArt Core Blogger Team and did receive products and payment for this post. However, all thoughts, opinions, and ideas are my own!


What a fantastic transformation Rebecca. Love the pattern and it looks brand new! GreaT JOB! hAVE A WONDERFUL DAY! BONNIE 🙂
This is definitely something I would want in my home. I’ll have to keep a look out at thrift stores for wooden boxes.
Thanks Heidi, have a super week!
Stopped by to tell you I love how your box turned out. Happy holiday season.
Thank you Theresa! Have a Merry Christmas!