The Crafted Sparrow

Create to Inspire!

  • Home
  • About
    • Advertise
    • About Me
    • Disclosure
  • Tutorials
    • home decor
    • diy
    • crafts
    • Cricut
  • recipes
    • Appetizers
    • Sides
    • Soups and Salads
    • Dessert
    • Drinks
  • holidays
    • new years
    • Valentine’s Day
    • st. patrick’s day
    • mothers day
    • fathers day
    • 4th of July
    • halloween
    • thanksgiving
    • christmas
  • free printables
  • Contact

Painted Tin Can Planters

06/02/2014 57 Comments

Disclosure || I am a member of the core blogger program with DecoArt.  I received compensation and product for this post.  All ideas and opinions are 100% my own.

painted-tin-can-planters

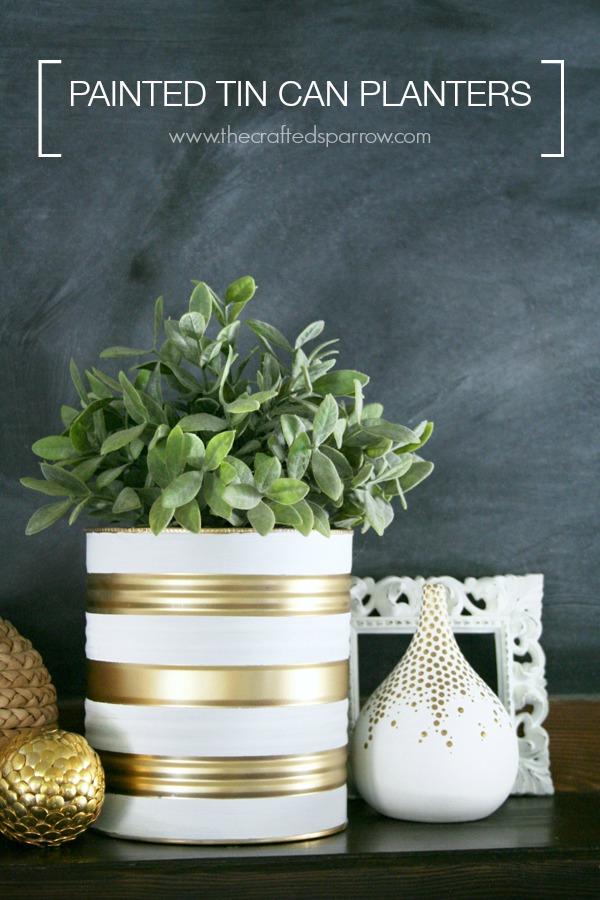
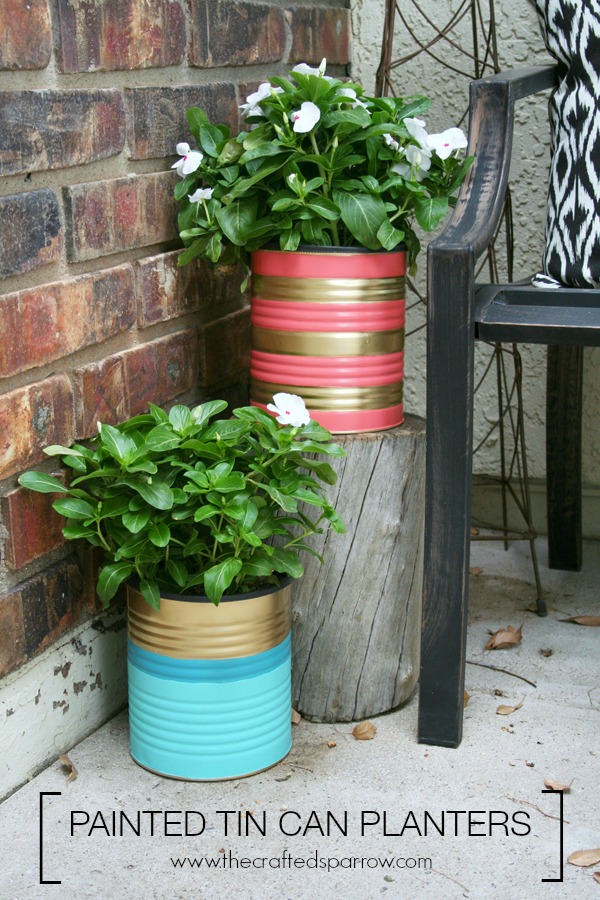
If you have been a reader of The Crafted Sparrow for any length of time then you know I’m a huge fan of using what I already have on hand to accessorize my home.  These Painted Tin Can Pots are the perfect example!

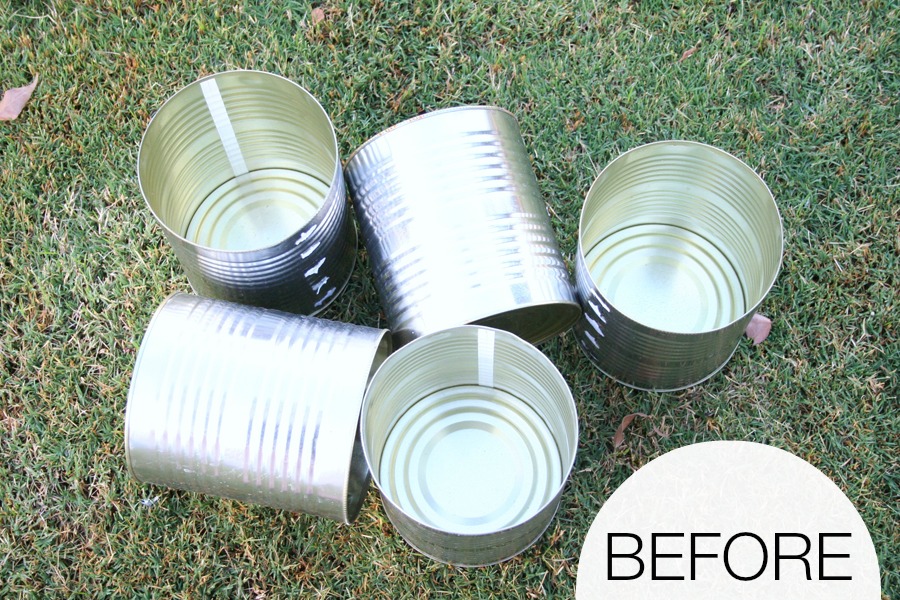
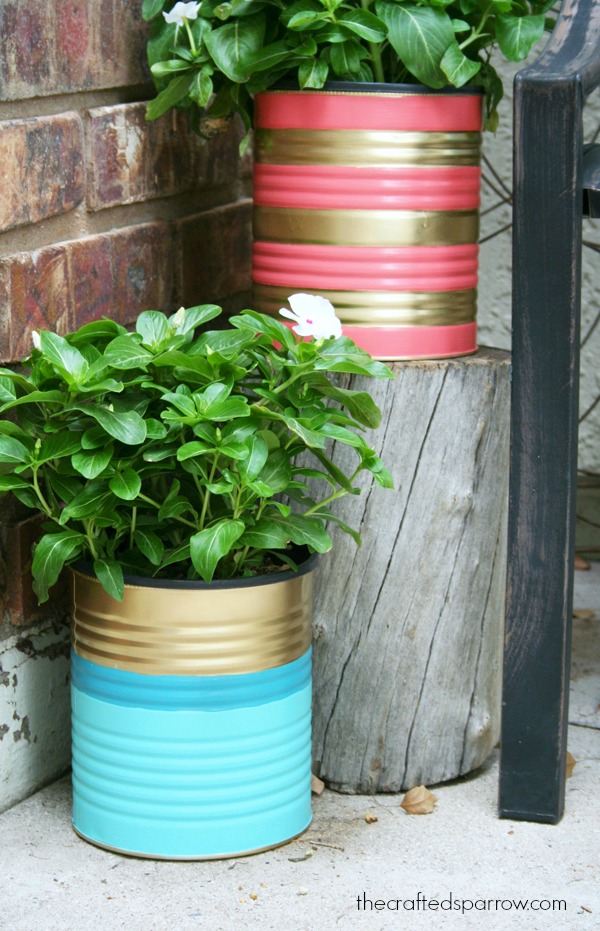
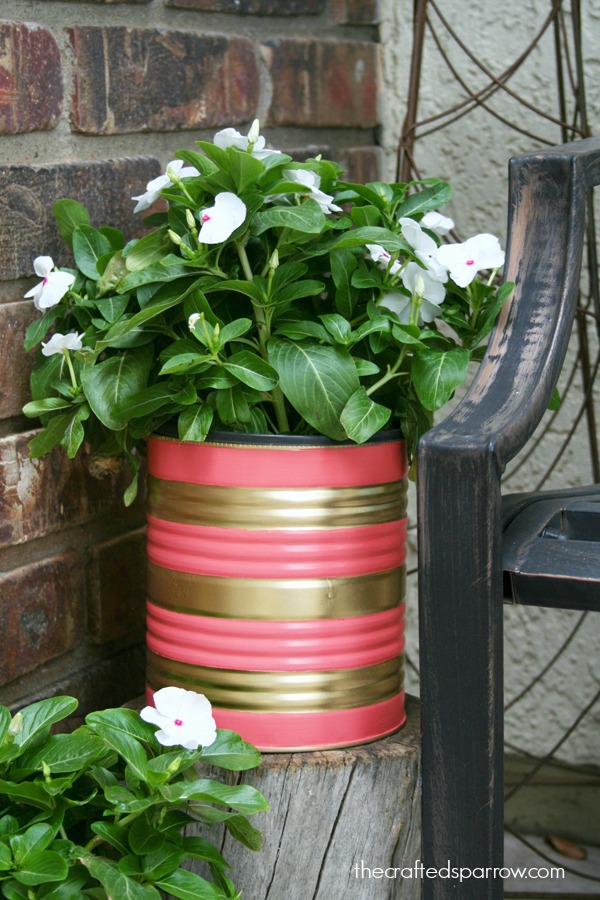
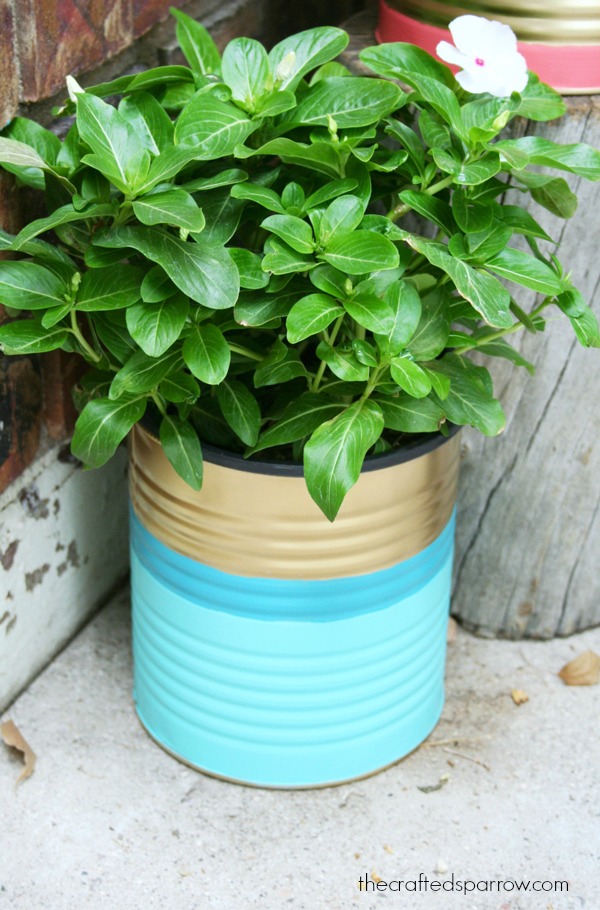
My hubby has been bringing home so many of these gallon sized tin cans he recycles from his restaurant when they throw them away.  He has taken up gardening and is planting things left and right lately.  I love the idea of re-using them, but I just couldn’t look at the boring tin can anymore.  This is where my DecoArt Patio Paints came in to action.  I decided to make some outdoor planters to spruce up our front porch, and a couple for in the house to freshen up my decor.

painted-tin-can-planters

Supplies:

–  DecoArt Patio Paint outdoor
–  Foam brushes
–  Painters tape
–  Gold spray paint

painted-tin-can-planters
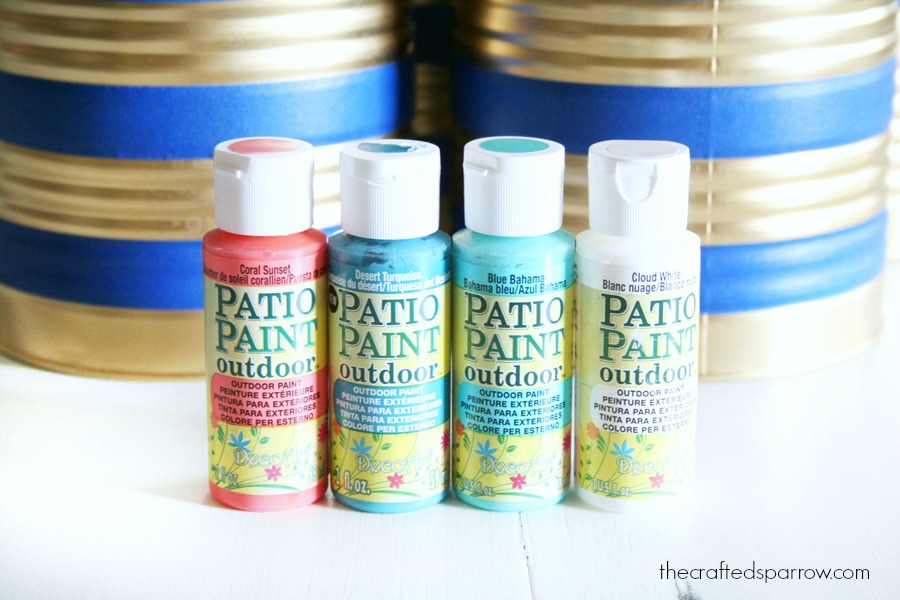
For this project I stuck with bright summer colors that already worked with some of our outdoor decor.

First thing I did was spray paint all the tin cans gold, I thought the gold would be fun mixed with the bright summer colors.

After the paint was dry I used some painters tape to create stripes on my cans.  You can do any design you want:  polka dots, stripes, color blocked, or a different pattern.

painted-tin-can-planters
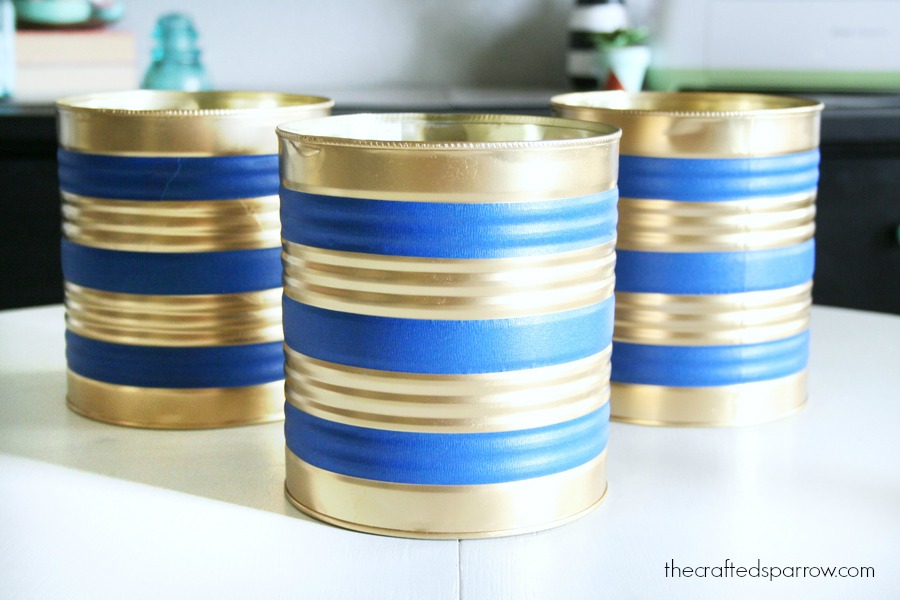
Using your foam brush apply 2 – 3 coats of each color where you want it.  Peel away the painters tape before it’s completely dry so you don’t accidentally peel up paint.

That’s it, your set to plant.  You can drill drain holes in the bottom if they will be used for outdoor planting like these ones.

painted-tin-can-planterspainted-tin-can-planters

This was such a great way to add a pop of color to our front porch for free since I already had the paint on hand.  We want to spruce this space up soon but for now these cute planters add character and the color I wanted.

painted-tin-can-planterspainted-tin-can-planters

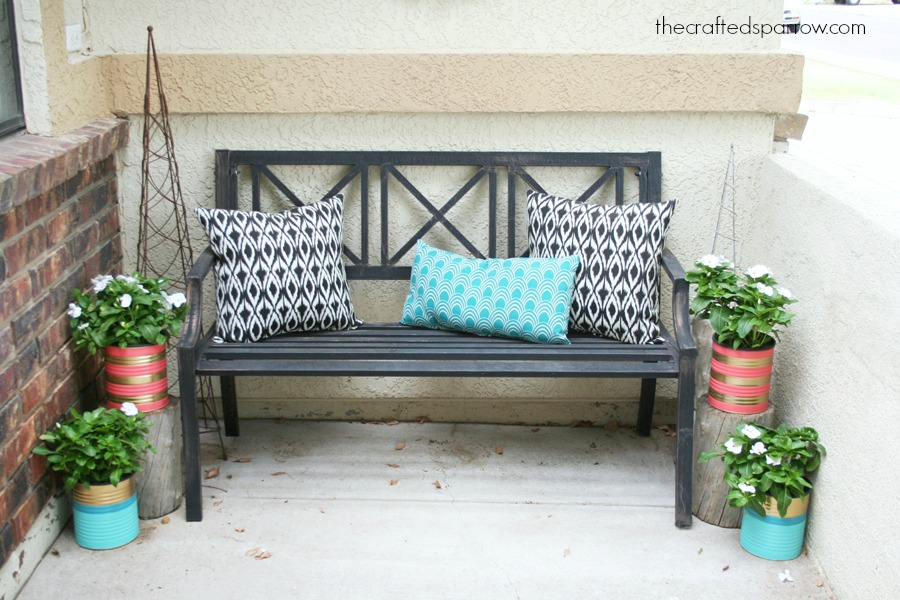
Like I said I also painted a couple for inside the house to use with my decor.  I love how they look with my favorite Ikea greenery.  It’s such a great way to add some character to a space on a budget.

painted-tin-can-planters

painted-tin-can-planters

Related Posts

  • Notebook Paper ChalkboardNotebook Paper Chalkboard
  • Copper Inspired Fall TablescapeCopper Inspired Fall Tablescape
  • DIY Slip Covered Ottoman & Freezer Paper Stencils {it’s a double post!}DIY Slip Covered Ottoman & Freezer Paper Stencils {it’s a double post!}
  • Stenciled Wood BoxStenciled Wood Box
  • Fall Wood BannerFall Wood Banner
  • Chalky Finish TableChalky Finish Table

Filed Under: before and after, crafts, decoart, diy, home decor, home improvement, Tutorials

« Kick Off Summer Giveaway
16 Father’s Day Gift Ideas »

Comments

  1. Bonnie @ Uncommon Designs says

    06/02/2014 at 7:46 AM

    Love these Rebecca!!!

    Reply
  2. Leigh Anne says

    06/02/2014 at 7:49 AM

    So FANTASTIC! I pinned and shared on Google+ 🙂

    Reply
  3. DIanna says

    06/02/2014 at 8:27 PM

    Did you put holes in the bottom so water could drain?

    Reply
    • craftedsparrow says

      06/11/2014 at 5:37 PM

      I did on the outdoor planters with a drill and small drill bit. The indoor ones no since they have artificial plants in them. 🙂

      Reply
  4. leanne says

    06/03/2014 at 7:38 AM

    This is perfect for all the coffee tins I have laying around! The white and gold one I love!

    Reply
    • craftedsparrow says

      06/11/2014 at 5:34 PM

      Thanks Leanne. 🙂

      Reply
  5. Liz @ Liz on Call says

    06/06/2014 at 3:54 PM

    These are beautiful! Perfect on your porch.

    Reply
    • craftedsparrow says

      06/11/2014 at 5:31 PM

      Thanks friend! Good seeing you last week even if it was only for a few minutes.

      Reply
  6. Desiree @ The 36th Avenue says

    06/06/2014 at 6:59 PM

    I love this so much! I am featuring you tomorrow… Thank you for linking up with The Party Bunch!!! Desiree

    Reply
  7. tisa says

    06/08/2014 at 7:21 PM

    I love this idea…these are soooo super cute! Thanks for sharing.

    Reply
    • craftedsparrow says

      06/11/2014 at 5:28 PM

      Thank you Tisa. Have a great week.

      Reply
  8. Emily says

    06/16/2014 at 1:32 PM

    LOVE LOVE LOVE! What a great idea! Thanks for sharing 🙂

    Reply
    • craftedsparrow says

      06/17/2014 at 12:04 AM

      Thanks Emily! Have a super week!

      Reply
  9. malia says

    06/19/2014 at 5:43 AM

    Absolutely beautiful!

    Reply
    • craftedsparrow says

      06/25/2014 at 10:24 AM

      Thanks Malia. 🙂

      Reply
  10. Bonnie says

    09/03/2014 at 6:39 PM

    Those look really attractive. I’m calling my friend who owns a restaurant tonight!

    Reply
    • craftedsparrow says

      09/03/2014 at 9:38 PM

      Thank you Bonnie! Have a great weekend.

      Reply
  11. Ruth says

    09/03/2014 at 6:49 PM

    Love these! Didn’t you have to line them before you used them as a planter? Just curious as I thought I’d have to line it so it wouldn’t rust out from the bottom?

    Reply
    • craftedsparrow says

      09/03/2014 at 9:38 PM

      Hi Ruth. I didn’t line them, but that is definitely an option. Mine have rusted but I actually like the rusted look so it doesn’t bother me too much. They do have drain holes. As for the ones I use indoors I only use fake plants in them since I have a bit of a black thumb. Have a super weekend! 🙂

      Reply
  12. Emily Glynn says

    09/04/2014 at 3:03 AM

    Just wondering how to keep the cans from rusting…….I absolutely love the idea and the cans are beautiful. Can’t wait to see new ideas!!! Thanks,
    Emily Glynn

    Reply
    • craftedsparrow says

      09/04/2014 at 9:52 AM

      Hi Emily. Well to be completely honest I never gave the rust option much thought. I have quiet the black thumb generally when it comes to gardening. For the outdoor cans though some people have suggested using a plastic liner. Mine have developed some rust on the outside bottoms of the cans which I actually like the look of so it doesn’t bother me. And my plants seem to be doing fine in them. I have currently planted elephant bush succulents in them and they are holding up really well. 🙂 Have a super weekend.

      Reply
  13. Zandra Zuraw says

    09/04/2014 at 6:16 AM

    Hi Becca,
    These are sooo sweet! I think using gold (either with the colors or with the white) really transforms the cans. And I do especially like your interior vignette with the white and gold objects 🙂
    Cheers,
    Zandra

    Reply
    • craftedsparrow says

      09/04/2014 at 9:49 AM

      Thanks so much Zandra! You are so sweet. The white and gold combo is definitely a favorite of mine right now. Have a super weekend.

      Reply
  14. kristi says

    09/04/2014 at 8:14 AM

    These are great! They add some great color to your porch. Thanks for sharing.

    Reply
    • craftedsparrow says

      09/04/2014 at 9:48 AM

      Thank you Kristi! 🙂 Have a super weekend.

      Reply
  15. Tara @ Anything & Everything says

    09/11/2014 at 9:44 PM

    I absolutely love these! Great idea! I love them so much, I am including them in my Fabulous Finds Friday this week!

    Reply
    • craftedsparrow says

      09/30/2014 at 3:01 PM

      Thanks Tara! So sweet of you. Have a great week.

      Reply
  16. norma assante says

    10/22/2014 at 9:42 AM

    when you apply the painter’s tape, are you preserving the gold under it? and then spraying what is not covered? then is the result…where you placed the painter’s tape and later removed, leave you with gold that you covered? i am not getting the procedure.

    Reply
    • craftedsparrow says

      10/22/2014 at 1:25 PM

      Hi Norma. First I spray painted the cans gold yes, then I applied the painters tape over the gold to create my design/pattern/stripes. Then for this particular project I used a brush on acrylic paint to paint my second color choice, you could use a spray paint as well. Once the paint is dry remove the tape. Hope that helps. 🙂

      Reply
  17. Trudy says

    10/25/2014 at 11:01 PM

    Thanks so much for sharing this idea. It is wonderful. I can envision doing this with smaller cans too. I was going going to try to cover the 14-16 oz size cans in fabric – to use as pencil and pen holders in my bedroom. But, I like your idea so much better and it is really striking and I am sure much easier than what I was going to do!

    Reply
    • craftedsparrow says

      10/26/2014 at 8:31 PM

      Thanks Trudy. You will love them!

      Reply
  18. Brittani says

    10/29/2014 at 7:55 AM

    This is a wonderful idea. For a added touch you can place one coffee filter sheet after drilling holes and before placing in soil. This will keep the soil from leaking out. 🙂

    Reply
    • craftedsparrow says

      10/29/2014 at 12:20 PM

      Thanks Brittani, great idea. 🙂

      Reply
  19. Mark says

    11/05/2014 at 7:11 AM

    Awesome Idea! I absolutely admire the way that you respect everyone’s opinion and respond to each comment, no exceptions.

    Reply
    • craftedsparrow says

      11/05/2014 at 9:56 AM

      Thank you Mark. Hope you have a great week, and thanks again for the kind words! 🙂

      Reply
  20. Trucos y Astucias says

    04/30/2015 at 5:35 AM

    Hello! We shared this repurposed idea in the post: 18 floreros que puedes hacer con manualidades

    Thanks for your work!

    Reply
  21. Bianna says

    11/25/2015 at 7:06 PM

    Very useful and beautiful ideas. I will try to do it at home. 😀

    Reply
    • craftedsparrow says

      11/29/2015 at 9:40 PM

      Thanks Bianna. 🙂

      Reply
  22. Bridget says

    04/02/2017 at 3:23 PM

    Did you have to prime the tins before you spray painted them?

    Reply
    • craftedsparrow says

      05/12/2017 at 1:13 PM

      Hi Bridget. No, you don’t have to prime the cans first…but if you want to you can. It will only help to make the painting a bit easier. 🙂

      Reply

Trackbacks

  1. 20 Craft Ideas {Link Party Features} I Heart Nap Time | I Heart Nap Time - Easy recipes, DIY crafts, Homemaking says:
    06/15/2014 at 8:04 AM

    […] Painted Tin Can Planter from The Crafted Sparrow […]

    Reply
  2. Painted Tin Can Planters says:
    06/19/2014 at 5:03 AM

    […] blogs at The Crafted Sparrow.  Lately her husband has been bringing home large tin cans from his restaurant when they get […]

    Reply
  3. Trending Tuesday: 7 Easy DIY Planters - Creative Juice says:
    06/30/2014 at 7:44 PM

    […] This one’s for those of you who drink coffee like my parents do…by the gallon. They’ve got coffee cans laying around everywhere! How cute are these? See the tutorial and other striped patterns from The Crafted Sparrow here. […]

    Reply
  4. DIY Gifts Under $2 says:
    11/10/2014 at 5:55 AM

    […] Painted Tin Can Planters from The Crafted Sparrow […]

    Reply
  5. 34 Handmade Gift Ideas for the Holidays says:
    11/19/2014 at 10:23 AM

    […] Tin Can Planter […]

    Reply
  6. On the Front Porch with The Crafted Sparrow says:
    02/11/2015 at 7:00 AM

    […] Painted Tin Can Planters […]

    Reply
  7. Cómo remodelar nuestra casa con poco presupuesto - An Inspiring Mompreneur says:
    03/13/2015 at 10:02 AM

    […] Cuadro de pared Floral /8. Bird Wall Art/9. Rustic DIY Bathroom Shelving /10. Gold Leaf Jewelry Tray/11. Scalloped Wall Tutorial/12. Painted Tin Can Planters […]

    Reply
  8. DIY Outdoor Decor and Crafts - 100 Directions says:
    04/20/2015 at 4:01 AM

    […] greenery? The Crafted Sparrow shares how to up-cycle tin cans to make these beautiful modern painted tin planters. I love how bright the colors […]

    Reply
  9. 18 jarrones y floreros que puedes hacer con manualidades - Trucos y Astucias says:
    04/29/2015 at 4:57 AM

    […] Fuente. […]

    Reply
  10. 7 Creative Ways to Paint and Use Tin Cans - DIY Scoop | DIY Scoop says:
    05/05/2015 at 3:49 AM

    […] These may be my favorite of all. The color blocking adds to the visual appeal, and I love the use of gold paint. The instructions are found at The Crafted Sparrow. […]

    Reply
  11. Currently Stalking | Created By Lola says:
    05/29/2015 at 7:54 PM

    […] these painted tin can planters. […]

    Reply
  12. Simple DIY – Coffee Tin Planter | the yellow coin purse says:
    08/04/2015 at 8:44 PM

    […] searching around, I was inspired by The Crafted Sparrow’s Coffee Tin Planter and her adorable colour […]

    Reply
  13. 10 Ways to Reuse a Coffee Can - StorageUnit.com says:
    09/15/2015 at 2:35 PM

    […] desired sections of the can with the outdoor patio paint. Lastly, fill them with plants! Check out The Crafted Sparrow for design […]

    Reply
  14. Super Easy DIY Striped Tape Decorations For Your Lovely Homes - Top Dreamer says:
    02/07/2016 at 3:18 AM

    […] Photo via: thecraftedsparrow.com […]

    Reply
  15. Great Ideas -- 15 Spring Home Ideas! says:
    03/12/2016 at 1:00 AM

    […] Painted Tin Can Planters @ The Crafted Sparrow […]

    Reply
  16. 12 Ways To Reuse Empty Cans | Monika Trump Official says:
    06/01/2016 at 5:05 PM

    […] Add a splash of color to your front porch with these DIY planters. […]

    Reply
  17. Fall Home Decor Tour! - says:
    10/10/2016 at 12:53 PM

    […] Plants (DIY Pots), Mug, Pumpkin Spice […]

    Reply

Leave a Reply Cancel reply

Your email address will not be published. Required fields are marked *

This site uses Akismet to reduce spam. Learn how your comment data is processed.

  • Email
  • Facebook
  • Instagram
  • Pinterest
  • Twitter

Copyright © 2025 · Genesis Framework · Design By: Key Lime Digital Designs · Privacy Policy · Log in